WordPress Category Settings
In this post, I will show you how to Add, Edit, Delete and Arrange Categories in WordPress.
What a is Category in WordPress Posts ?
Category is used to indicate sections of your site and group related posts. It sorts the group content into different sections. It is a very convenient way to organize the posts.
To access the Category section, follows the mentioned steps −
Step (1) − Click on Posts → Categories option in WordPress.

Step (2) − The Categories page is displayed as shown in the following screenshot.

Following are the details of the fields on Categories.
- Name − Enter the unique name of categories.
- Slug − A word chosen to describe your post. It is specified in the tags URL.
- Parent − By selecting the parent category from dropdown, you can set the particular category as sub-category or can keep it as None.
- Description − Add brief description of your category. It is optional.
Step (3) − After filling all the information about Categories, click on Add New Category button.
Step (4) − After clicking on Add New Category, the new created category will get displayed on the right side of the page as shown in the following screen.

Editing Categories
Following are the simple steps to edit categories in WordPress.
Step (1) − Click on Posts → Categories in WordPress.

Step (2) − You can view Category1 (Category1 was created in the chapter WordPress – Add Category). When the cursor hovers on the Categories, then a few options get displayed below the Category name. There are two ways to edit the categories i.e. Edit and Quick Edit
Edit − Click on Edit option in Categories section as seen in the following screenshot.

You can edit any of the required field, and then click Update button as shown in the following screen.

Category fields are same from the chapter WordPress – Add Category.
Quick Edit − Click on Quick Edit option in Categories section as shown in the following screen.

Here, you can only edit the Name and Slug of the category as seen in the following screen and then finally click on Update Category button.

Deleting Categories
Following are the simple steps to delete categories in WordPress.
Step (1) − Click on Posts → Categories in WordPress.

Step (2) − You can delete Category1 (Category1 was created in the chapter Wordpress – Add Category). When the cursor hovers on the Categories, a few options get displayed below the Category name. Click on Delete button as shown in the following screen.

When you click on delete, you will get a pop message asking for confirmation to delete the particular category as shown in the following screenshot.

You can click on OK button and delete the category permanently.
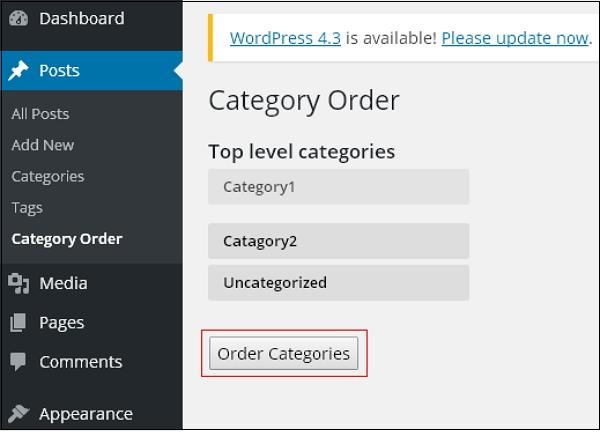
Arranging Categories
You can’t arrange categories directly in WordPress. Hence, you will need to install Category Order plugin to arrange the created categories in a particular way.
Step (1) − Click on Posts → Category Order in WordPress. The Category Order menu displays after adding the Category Order plugin. You can study how to install plugins in the chapter Install Plugins.

Step (2) − In the following screen, you can see that the create categories section are not in order.

Step (3) − Now, you can rearrange your categories by just dragging the categories as per your choice. Click on Order categories button to save the ordered categories.
Footnote
If you encounter any problem while customizing your WordPress website. Feel free to leave your question into the comment box below or contact me through the contact page. If you are yet to create your own website, get started by Clicking Here.